|


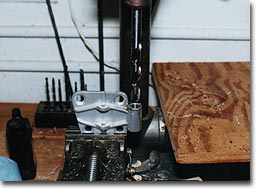
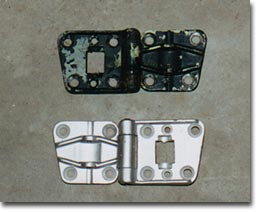
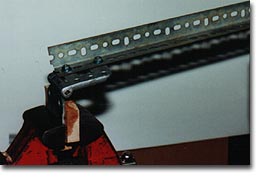
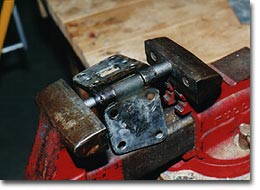 Pressing apart hinge with big-socket/ little-socket technique. 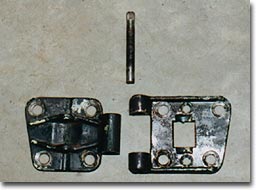 Dismantled hinge.
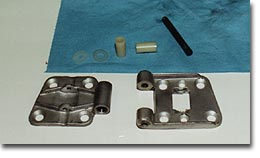
| by Julia Sue Perti GTV Door Hinge Restoration fix those floppy hinges for less than a dollar! It's a fact that many, maybe most, Bertone GT-series coupes suffer from saggy doors which droop when opened, and only close under protest and much unpleasantness. The culprit: worn out hinges. To test yours, open the door and attempt to lift. If you find any play, your hinges are dying or dead. The length of the door, its weight, age and misalignment are all contributing factors. Why age? Because-- and this is apparently not well known -- the actual bearing surface of the hinge is an internal rubber bushing. Like all rubber parts, it deteriorates with age, at a greater or lesser degree depending on environmental factors. (Remember this the next time you are tempted to oil those hinges. Eventually the oil will turn the rubber into goo!) So what's a mother to do? NOS hinges are getting increasingly difficult to source. A few years ago I was lucky enough to find a set for $70. Half decent used parts are still available, but getting more and more scarce. The answer: re-bush! (No, I'm not referring to our current US political situation. No emails, please.) It turns out that the hinges are perfectly restorable, given the gumption, a modestly equipped shop and some very inexpensive doodads from the local hardware store. Start by removing the hinge. To accomplish this you must remove the entire door. Begin by disconnecting the limit strap. This is done by driving the pin at the A-pillar upwards until the strap is free. Now you'll have better access to the eight screws that hold the upper and lower hinges to the A-pillar. (The screws actually attach to sliding plates behind the A-pillars; the sliding plates allow slight variations in orientation to facilitate alignment.) Should you mark the hinge and sheet metal for realignment and reassembly? You can, though the bare paint spot will probably be ample guidance, and in fact your old alignment will probably be invalid with refreshed hinges. Early GTs (up to about '68) used Phillips head screws for the hinges. Later cars have socket head screws. For the Phillips heads screws, I've found they usually come free after a sharp, square blow delivered by a large hammer via a tight-fitting jumbo Phillips head screwdriver. You must be patient and work the screws carefully, as if you booger up the heads, you will have a genuine gumption trap on your hands. Whatever else, resist the temptation to go at it with the impact wrench! Once the screws are free, have an assistant help you remove the door . Careful lay it down on a piece of old carpet or other forgiving surface so that you don't mar the paint. I've done this job by myself several times with the aid of a floor jack,-- it is possible. Keep in mind though that the tolerances at the front edge of the door where it meets the rear fender are extremely tight and it is really easy scratch things up, so BE CAREFUL. With the door is off, removal of the hinges is straightforward. Note that it is usually only necessary to rebuild the upper hinge as they suffer the greatest abuse and wear-- so leave the lower hinge be unless you are a masochist. Dismantle the limit strap from the upper hinge. This is your change to rebuild this, too. Last I checked the rubber-covered steel straps were still available from Alfa. Now it's time to dismantle the hinge. It's simply a matter of driving the pin out -- upwards as it is oriented in the vehicle -- using some manner of press. My "press" for this application is nothing more than a large bench vise with a pair of junk sockets to act as the pusher and receiver. Just be sure everything is lined up perfectly square; you may need to file a bit of material off of the shoulder of the hinge to ensure this is so. Not difficult -- you'll have probably discovered by this time that the hinges are aluminum. Now is your opportunity to cosmeticise the hinge components, or not, depending on their condition and your particular level of anal-rententiveness. I bead blast mine, taking care to block the pin holes in the upper and lower ears first so that grit doesn't enter. (The center ear doesn't matter, as you are about to drill it out anyway.) In the center ear you may find the remnants of the original rubber bushing. (In my nephew Johnny's center ear we often find ... never mind.) You may find other strange things. Once, I discovered that some previous craftsperson had attempted to shore up the bushing with a very ill-fitting piece of copper pipe. Clean all such garbage out. I've heard of some folks having the hinges resleeved with bronze bushings by a machinist. An expensive route and a dubious proposition, given that the original bushings were flexible rubber. The thinking behind the original design is unclear, but when it doubt, it's usually a bad plan to try and out-engineer Alfa Romeo. My solution is to replace the bushings with inexpensive nylon "spacers" from the local hardware store. These spacers come in a variety of sizes and, where I shop at least, are sold individually in bins alongside general-purpose bronze and nylon bushings. The dimensions you need are*:
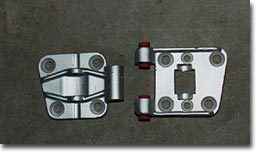
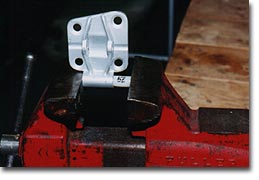
That 5/16" bore is a near perfect for the 8mm pin. The spacers cost less than $.30 each; two are required per hinge. The central, "male" hinge bore must be enlarged slightly to accept the spacer. To make the 1/2" spacer an interference fit, I bore them out to 15/32" using a drill press. Some care is required in setting up the piece for boring. Use a 3/8" bit to check the alignment before locking everything down and proceeding with the actual cutting. | |
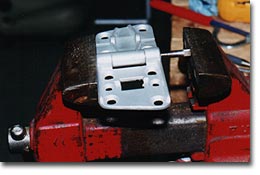
| Next, press the spacers into the hinge bore using a vise. When the first spacer is fully seated, press the second in from the other side. You'll be left with about 1/2" excess which you can trim off with a hacksaw. With the spacers pressed in, the internal diameter will have shrunk slightly. Run a 5/16" drill through it to create a tight fit for the 8mm pin. Reassemble the hinge by pressing the pin back through. Use a pair of nylon washers to take up axial play. Violá! The hinge should be very tight. The NOS hinges I've run across are extremely so, to the point of being difficult to open and close with bare hands. Remember that those doors are heavy! Still, sometimes the refurbished hinges need a little breaking in before being put into service. You can accomplish this by clamping one ear in a vise and attaching an arm to the other, as shown. A few hundred cycles should do the trick nicely. All that's left now is to paint, reassemble, and realign the door. Getting the GTV door alignment right is a difficult job that can seem impossible because of the earlier mentioned earlier issues between the front of the door and the rear portion of the front fender. Be patient and methodical, though, and you'll soon get it right. (Hint: You might need to realign the striker plate as well.) Oops, look at the time! I'm afraid I have to leave it at that, as I've got to go pull a batch of desiccant out of the oven. So until next time, * Postscript: Correspondent Jay Mackro of San Juan Capistrano was able to track down the nylon spacers as his local True Value Hardware. He reports that the box with the bushings was marked: Thanks Jay! Aunt Julia will bake a rhubarb pie in your honor. | ||
more Julia Sue: | ||
| Copyright © 2000 AlfaCentro & Forza Modern Media. All rights reserved. Neither AlfaCentro.com, it's publisher, FORZA Modern Media, LLC., or the individual article authors makes any warranties, expressed or implied, that the techniques, modifications, and procedures outlined in these stories are free of errors and omissions, meet applicable safety standards, or are suitable for the purposes described. The publisher and authors also expressly disclaim all liability for damages that may arise from the use of information presented in these articles. alfacentro • articles • vendors • free classifieds • free post space • ad rates |