|


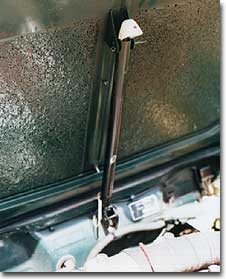 telescoping hood support strut | by Julia Sue Perti The Problem How it's supposed to work | |
| The strut performs it's primary hood prop function perfectly well. However, it is also responsible for the initial pop to free it from the clutches of the main catch, and this is where it frequently falls down, so to speak. The geometry of the design is such that the spring has decreasing leverage as the hood approaches fully closed. No doubt this is on purpose -- otherwise the force necessary to hold the hood open would make the hood extremely difficult to shut. Whatever. As the spring weakens naturally over time it seems that while it can still provide the muscle to hold the hood upright, it can't quite muster the energy for the simple pop to open the hood in the first place. Off to the Bat Cave, Alfred. The fix | stewardship; future generations ought to be able to enjoy these wonderful machines as well. Now having said that, and not having a replacement strut handy, and feeling somewhat dubious whether a used one would be any better, I set out to find a way to improve the situation. The obvious first course of action was to attempt to rebuild the telescoping strut, bolstering the mainspring either with shims or perhaps an additional helper spring. Taking the strut apart was not exactly straightforward -- it involved building a jig in order to safely compress the spring to the point where the pin holding the hoe thing together could be removed. Alas, in the very greasy & grungy process I discovered that the spring is literally completely compressed at the point where you can disassemble it — rendering any kind of internal shimming impossible. I experimented with other sorts of ways to bolster the mainspring without terribly promising results. It seemed likely that an inexpensive off -the-shelf spring with the requisite length and diameter could have been found to install inside the main spring — but in the meantime I had another idea. | |
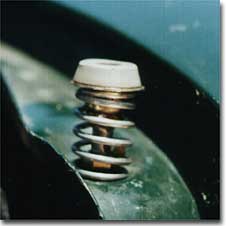
| Plan B While studying the problem, I kept fixating on the rubber hood stops. What if these were spring loaded? Wouldn't that fix this nonsense once and for all? It seemed perfect and natural: the stops are on a meaty part of the structure, and act on a similarly reinforced area of the hood. No problem there. The bearing tube for a spring loaded shaft already existed in the form of the threaded hole that the bumper screwed into. The only problem was that I didn't want to do anything I couldn't easily undo. If using the hood stops meant destroying the threads I would keep looking for another solution — even well-intentioned and executed modifications might seem rapacious to future eyes, and besides, I wasn't even sure this would work. I sure didn't want to booger my beloved Super up finding out. So, the whole problem boiled down to this: what can I find to install in the threaded hole to serve as a bushing; something that will protect the threads indefinitely while providing a suitable bearing surface. That something ought to be threaded with a hole through it; a hex head to put a wrench on it would be nice but not really necessary... kind of like ... uh... wow! that's an idea -- could it possibly fit?... kind of like ... geeze, that's it.... where it is it, whereisit... kind of like a 3/16" BRAKE LINE FITTING! Does it fit? Yeah, M10 X1.0, should fit... YES! Eureka. After this revelation - the rest of the assembly pretty much designed itself. In the truest tradition of a mid-sixties Alfa, the part count is borderline ridiculous. But everything save the brake line fittings used can be found at a well stocked hardware store, probably for under $5 total. The brake line fittings are as common as dirt at NAPA, etc., though if you're like me you'll have a pile of leftovers already sitting on a shelf somewhere. |  stock hood stop | |
 the component parts of the spring loaded hood stop | ||
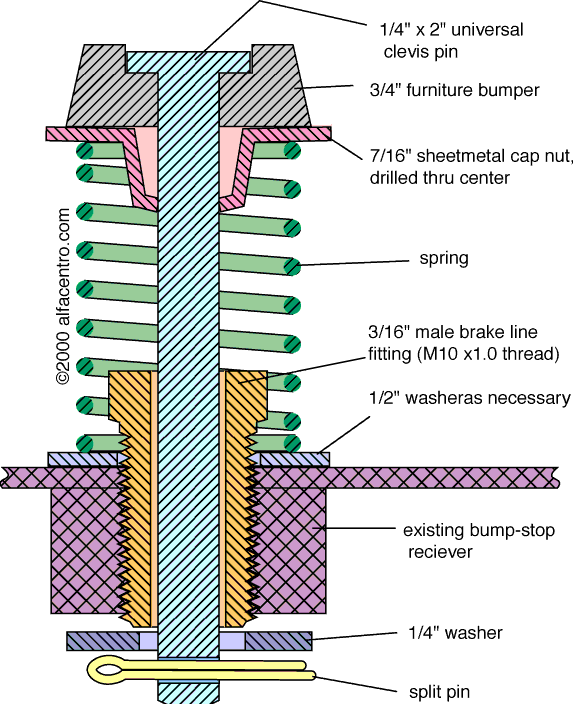 click to view enlarged diagram | Ingredients (need two each) 3/16" hydraulic brake line fittings -- male, thread M10 x 1.0mm 1/4" x 2" universal clevis pin (2) 3/4" rubber furniture foot 7/16" sheetmetal cap nut 3/4" x 2" compression spring (experiment) 1/4" washer 1/2" washer split pin Recipe As I was unable to find a 3/16" diameter universal clevis pin, I resorted to boring the brake line fittings to 1/4". This is not difficult as they are (typically) only mild steel. Use a drill press(!) Hint: line up the workpiece with a 3/16" bit to properly center things before chucking up the 1/4" bit. And wear your safety glasses, please. The cap nuts will also need to be drilled. Though "only sheet metal" these are typically chrome plated and apparently somewhat hardened; drilling these is not the piece of cake you might imagine. A drill press helps; don't forget to center punch. Finally, the small holes in the furniture bumpers will need to be enlarged. This IS a piece of cake. | |
| Assembly Close the hood and take note of the hood shut lines and they way the hood fits in general. Your goal is to duplicate or better this with the new stops. Remove the existing stops, including the washers, if any. Put them somewhere safe where you can find them in twenty years. (If you are tempted to throw them away, send them to me instead.) Screw a brake line fitting into one of the threaded holes. Stop with the fitting flush with the bottom of the boss. Push the clevis pin through the furniture bumper, the cap nut and the spring (see illustration). smear a little grease on the pin and slide into the fitting. Pushing down on the spring, add the small washer underneath put the split pin through the first hole. DO NOT BEND THE PIN YET. | Repeat the above procedure with the other side. Again, do not bend the split pin. Now test the hood for proper closure. The hood should fit as before, and open smartly with a pop of the handle. If adjustment is necessary, it is a trial and error process of adding washers between the spring and the car's sheet metal. One or two washers should do it. Once you are satisfied, bend the split pins to lock them in place. As Carroll Smith would say, "No meathooks, please." The Wrap That's it for this month. Stay tuned; next time we'll spare some Giulietta trim from the trash bin. ciao, Julia Sue | |
|
| ||
alfacentro • articles • vendors • free classifieds • free post space • ad rates