|


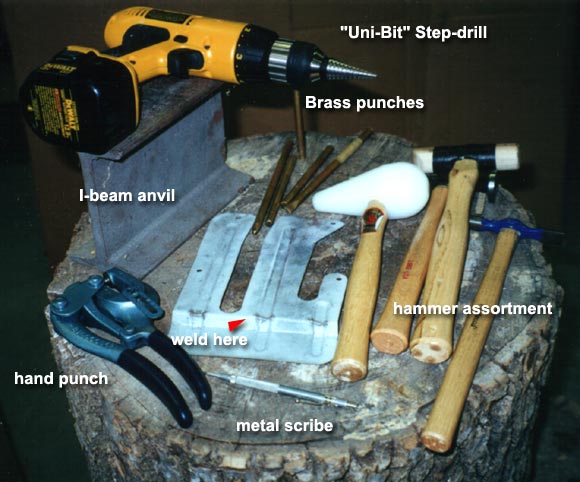
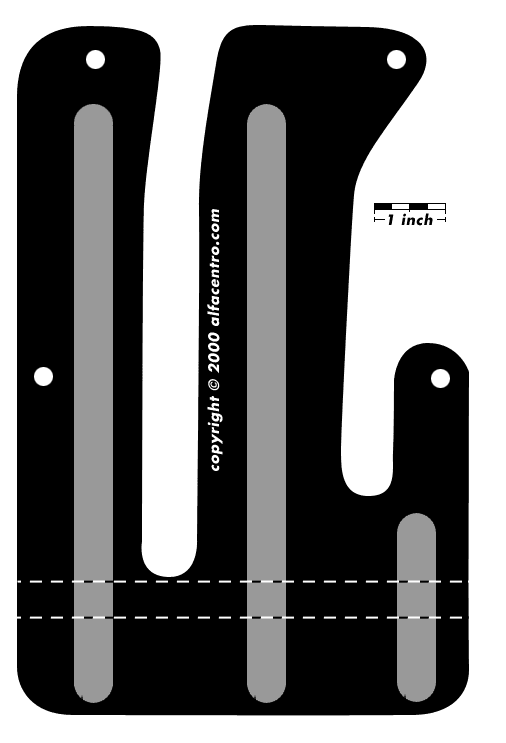
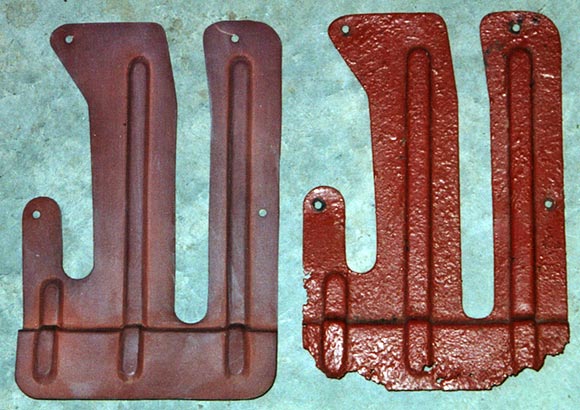 Hand-fabricated cover (left) next to original, corroded cover. Original finish was black. (click illustrations for enlarged view) 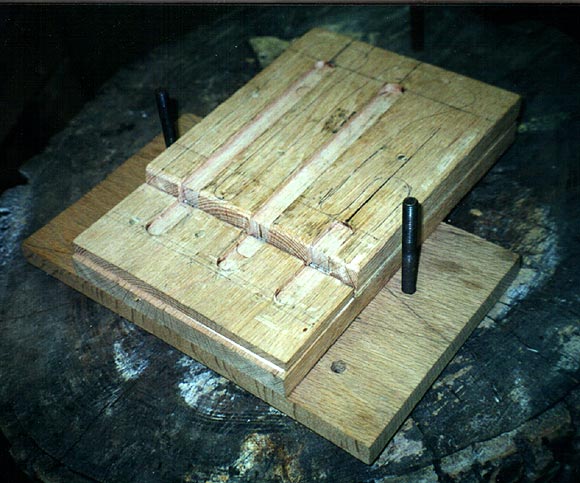 Home-made hammer-form. | by Julia Sue Perti LHD 105 pedal-box cover a basic sheetmetal fabrication project One of the parts that always seems to suffer form the ravages of the voracious tinworm, even on otherwise clean 105s, is that sheet metal cover on the pedal box that forms the floor underneath the foot-operated controls (on LHD cars). Wet galoshes and the wicking action of the felt sound padding glued to it are doubtless the culprits. Replacements are unobtainium, and good used parts are likewise difficult to find. What's a mother to do? Why, fabricate, of course! Actually, this project is trivial if you don't give a whiff about the appearance of originality and are willing to forego the reinforcing ridges stamped into the cover. However, with a little extra work and a few hand tools, you can make a part that is virtually indistinguishable from OEM. Best of all, you will hone valuable metal working skills that will serve you well in the future when you tackle bigger jobs like floor or rocker replacement. First of all, a short paean to safety: protect your eyes, ears and extremities when you work, please. Don't make your mama cry. A sliver of steel in your eyeball has a way of ruining your day. Untreated edges of freshly cut steel can slice through your fingers like a plastic knife through butter at the 4th of July picnic, and tools capable of hacking, drilling or punching through steel can do so through flesh in alarmingly short order. Be smart and wear your safety glass, earplugs and leather gloves. Think about what you're doing and always consider what could go wrong if your hand slipped or the tool broke. On to the project. The original part, 105.00.51.147.01., was a simple 22 gauge, mild-steel stamping with no compound curves. The base of the cover has a short step, and three vertical ridges provide reinforcement Alfa deemed necessary. It's these ridges that provide the challenge in our project. To start, make an accurate stiff paper template of the finished piece. I have provided a gif that you can use for this purpose -- you'll need to print it on a printer that will scale it accurately, however. Otherwise you can use it as a guide while you make your own template based on your original part. To beat the ridges into the sheet metal, you'll need to build a hardwood hammer form. I use 3/4" oak boards which the local lumber yards sells in random-width seconds -- otherwise clear, flat boards with non-parallel edges and therefore quite reasonably priced. The basic idea is to build a female mold for the part. Using the template as a guide, grooves are cut into the wood with a router. The groove should be slightly wider and deeper than the original to allow for the thickness of the steel and its slightly elastic tendency. The step is formed in the mold by stacking the upper portion with a wooden shim. Take your time while constructing the hammer form; it doesn't need to be an act of 17th century cabinet-making, but on the other hand, garbage in, garbage out. Accuracy is paramount. Check your work against the original part. If you screw up, start over. It's a lot easier than trying to correct your mistakes "in the metal." To best duplicate the original part use 22 gauge sheet steel. Transfer your pattern for the template using a metal scribe. Again, accuracy counts -- "measure twice, cut once." It's now time to cut the part out. Start with the tight radius at the bottom of the slots. Mark the center of the imaginary circle which the describes the radius on workpiece and drill it out to the finished size using a Uni-bit step-drill. The remaining cuts can be made with shears or tinsnips, nibbler, skillsaw -- whatever you prefer or is handy in your shop. Dress the burs of your workpiece with a file or emery cloth. | |
| Now it's time to work in the ridges. As a shortcut, you can use a bead-roller (not a bread roller, girls) such as the hand-powered model Eastwood sells to start the ridges. The ridges do not run the entire length of the piece. Keep this in mind as you use the bead roller tool, and be careful to start and stop inside the perimeter of the part. Making the bends that form the step is next accomplished using a sheet metal brake, bench vice or other contraption of your ingenuity and invention. Metal bars or hardwood strips along with a pair of c-clamps are one way to get the job done. At this point you should have a part that is beginning to closely resemble the original. You could stop here if you want, and nobody will know the difference. But you've made that hammer form, so you might as well use it and turn out your version of old world craftsmanship. Clamp the part onto the form and get ready to work those biceps. After the first few dozen blows this will seem to have been a depressingly retrograde step; each hammer strike yielding only one more lump than before. But hang in there; eventually the part will start to take shape. I use lengths of brass rod with ends ground into various configurations to transfer the force of the hammer to the exact spot I'm trying to work. Work from the edges in. Steel becomes work-hardened after it is deformed past a certain point; further efforts will either cause it to crack or deform somewhere else. With luck you won't reach the limit before you've pounded the part into the desired shape. You'll find that the inside step on the ridges will have too much material; it will need to be shrunk in order to attain the desired shape. The easiest way to accomplish this is to grind the edge from the inside to form a slot in the material, pound to shape, and weld the seam. As a final step, true the faces of the ridges flat with an angle grinder. Resist the temptation to do this before the workpiece is as perfect as you can make it, because you can remove a lot of material very quickly, and ground down lumps become holes. The finishing steps are to punch or drill the mounting holes, prime and paint. Violá! Yes, this is an enormous amount of effort to expend on such a trivial part that, after all, will never see the light of day on a finished car. But in return for your labor you will have learned numerous metal working skills, and besides, you'll always know your meticulous reproduction is there, even if others can never guess. Finally, I'd be remiss if I closed without mentioning there are other ways to make this part. Certainly you could make a reproduction using ridges fashioned bar stock welded (or even riveted) to the flat sheet backing. It would be convincing except from the back, and again, who would know. You could also fashion this from aluminum, which is easier to work and lighter to boot. It could probably even be made from plastic. Until next time, | ||
more Julia Sue: | ||

| Copyright © 2000 AlfaCentro & Forza Modern Media. All rights reserved. Neither AlfaCentro.com, it's publisher, FORZA Modern Media, LLC., or the individual article authors makes any warranties, expressed or implied, that the techniques, modifications, and procedures outlined in these stories are free of errors and omissions, meet applicable safety standards, or are suitable for the purposes described. The publisher and authors also expressly disclaim all liability for damages that may arise from the use of information presented in these articles. alfacentro • articles • vendors • free classifieds • free post space • ad rates |